On the Road Again Quilt Pattern
Jump to How-To

Hither it is, after months of hiccups, finally, I have completed the Route Runner Quilt using the Trapunto method. So glad that I as well finally able to put the pattern & tutorial together and share them here!!!! I must also thank my son, a big fan of cars and vehicles, for his persistent "kind reminders" to pull me back to quilt his long waited quilt blanket.

This is the second quilt project I have done after my daughter's Secret Garden Trapunto Quilt published in May last year. Most of the method is the same except the piecing of the backing. I pieced the backing textile completely before attaching it to the forepart piece of the Clandestine Garden quilt, I find it a picayune problem to manage the 2 huge pieces for a good alignment past flipping them dorsum-and-forth to bank check. I did a footling improvised method hither and information technology is so much easier than earlier.
The Road Runner Quilt blanket has stretched a long journey since March 2013, that was when I started the projection during the finishing stage of my new house renovation. Autonomously from my daily busy life, juggle in between family, kids, works, and craft, I demand to visit the new business firm to check on the progress and coordinate with my interior designer on the design. Time diminishes when we get involved in too many tasks, I have to pause the quilt in between and concentrate on those in tiptop priority. Selection up again when I am allowed to continue. Glad that nosotros finally settle in our new house (click to view our home design) in June and that'due south where my son started his kind reminder again.

I would say that quilting and any crafts need momentum and stamina to carry on. In one case you accept paused in the middle of the progress, you will demand more courage and motivation to go dorsum on track. That is the reason why you meet that I keep on updating my craft pattern and tutorial here now and and then. The longer I stop, the harder information technology is for me to come back again. I love sharing my blueprint and tutorial in Arts and crafts Passion, as the proper noun tells, it is my passion and my infant, I practice not want it to perish without a valid reason.

My son tin can't look for his Road Runner Quilt to be done, he wants it immediately after I alleged that the quilt is completed!!! Oh, pity this cooperative young boy that he still has to await for me to wash and take photos before he can use it. On that nighttime while I tucked him in the bed with his long waited quilt blanket, he told me: "Mommy, next fourth dimension if yous accept whatever projection for us, please do it for me first, ok?", I was instantly put on a guilt trip, I hugged him and promised that he won't take to wait that long anymore.

Materials
- Applique fusible web (I used Steam-A-Seam), qty = 32 sheets
- Cotton blend batting (at least 64″ ten 86″)
- Polyester high loft batting (approximately 3/four of the blanket size)
- Quilting cotton thread, #50, white, coordinate colors and contrast colors of your choice
Tools
- Sewing Machine that is able to practise complimentary motion quilting, ie. with feed domestic dog down or covered (I used Bernina B550 Quilter'southward Edition)
- Darning foot (or Bernina Stitch Regulator, BSR), walking pes, i/4″ foot
- Quilter Safety pins and/or basting thread
- Fabric chalk or pencil and ruler
- Cut mat
- Rotary cutter
- Scissors
- Fe
- Printer and papers (letter of the alphabet size, qty= 37)
Instructions
Cloth Details:
1. White cotton 44″ wide, four 1/2 yards, pre-wash
2. Backing textile, calorie-free blue map print, 44″ wide iv yards, pre-launder
three. Black cotton wool 44″ broad, 1 1/2 yard, pre-launder to brand sure that it is colorfast
4. Red cotton 44″ wide, 1 yard, pre-wash to make sure that information technology is colorfast
v. Border folder, 2.5″, nine g
6. Applique and square patchwork:
Brand: Moda Fabrics
Fabric Designer: Malka Dubrawsky
Theme: A Stitch In Color, Pre-cuts five″ Charm Pack
Usage: 4 charm packs
Finished Dimension:
approximately 62″ x 84″ (to accommodate Super Single Bed).
If you want to quilt for single bed, the quilt size is 56″ 10 86″ and the center function include the inner boxed edge is 36″ wide. Suit the appliques and the residual of the component accordingly either past resizing them or omit some of them.
More Details On How To Sew together Road Runner Quilt
- a. Download the route runner quilt pattern and print the required pages from the design and applique template.
Note: some pages need to print multiple copies, otherwise, just print 1 copy.b. Cut material pieces according to the quilt blueprint downloaded from the above link.
c. The fabric pieces layout in the quilt pattern is ane″ bigger on each side than the actual size. Use fabric chalk or pencil lightly mark the actual size of all of the panels (on the right side), you may use erasable cloth marker but I find the lines faded abroad before I piecing up the quilt.
d. In order to get the admittedly straight grain lines, snip a small-scale cut at the edge of the fabric and tear forth the fashion is ever better than cutting by using scissor or rotary cutter.

- a. Plan your colors and fabrics advisedly for the applique, I used 5″ charm pack for about of the applique components except solid white, solid red, and solid black. If the 5″ charm pack is not big enough to cover an applique component, join ii pieces or 3 pieces to make upwards the size.
Refer to this method for a fast and easy way to brand a huge amount of material applique.
Sort out all the applique templates. Please refer to page 9 of the applique template to see how the car components are put together.b. Peel off the paper backing of the fusible web, stick the applique on the base fabric.
c. Check and confirm that it is correct before permanently fused it with warm iron at a medium heat setting.

- a. Cutting the high loft batting slightly bigger than the applique, pin it or use washable glue to temporarily stick information technology on the incorrect side of the white material where the applique was fused on.
b. Quilt the applique patchworks with the trapunto method.
The moving-picture show shows the incorrect side of the trapunto quilt.

- A complete car appliques assembly at the center piece of the quilt.

- a. The 3D effect of the alphabet is done by calculation a blackness background to the text applique.
Annotation: The applique template in grey shading is the black base.b. Repeat the applique assembly and trapunto process.

- This is the traffic light. I used a lighter shade of carmine, yellow and green fabrics to mimic the illuminating low-cal.

- a. For quick assembly of safety cone, refer to the applique template and line strips of black-red-white-crimson-white-ruby-black fabric on your table with red overlapping on blackness and white.
b. Check the width of strip required by comparing them to the applique template, i.e, with ruby-red beingness the exact size, black and white slightly larger. Yous may apply a tiny dot of fabric glue to keep the strips connect to each other.
The applique template is designed for the quick method, but if you don't like it, yous may cut out pieces of applique components separately and gather them side by side to each other, allow the white and black fabrics a little larger at the bring together.
- Completed Side panels with Traffic Light, Safety Cones and Speed Limit Sign.

- a. To get together the traffic lane, cut a strip of black and white according to E, F and M measurement equally shown in the material cutting page.
b. Piecing Eastward (white) in betwixt 2 strips of F (black), press seam with the seam assart on black fabric side.
c. Cut the black-white-black strip to 3 ane/2″ long, 42 pieces. Cut K strips to two i/two″ long, 42 pieces.
d. Piece them up alternatively into a long strip that assembles a traffic lane.
Quilt the white part with batting.
- The corners of the traffic lane are a little tricky to assemble, please take notation.
a. Cutting the white lanes in 45º at the middle of the piece according to the number shown in the picture. You should accept four strips of slanted cease traffic lanes after cutting, each strip with both ends slanted in reverse direction as shown in the "Piecing – Forepart" page of the pattern. Adjust them to form a rectangle as shown in the pattern page.b. Sew the paired ends together along the gradient cutting line, mensurate 1″ from the seam line at the horizontal center of the white lane.
Note: the seam allowance is more than than 1/4″. Marshal the pieces accurately to make a perfect corner.c. Repeat to all four corners to course a rectangle frame of a traffic lane.

- A set of side panels, top banner, and traffic lanes, waiting to join up with the center piece and backing slice. Piecing of v″ charm pack not shown in the picture.

- Join upwards all the front pieces together with i/4″ seam allowance.
Accept note on the prophylactic cones' and speed limit signs' orientation.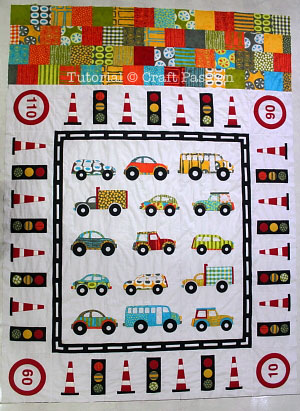
- a. Turn the front quilt slice facing down, smooth out the fabric. Best if yous have a large working table, otherwise, put it on the floor and tape the corner down and then that it won't move.
b. Lay the batting on top of the incorrect side of the forepart slice.
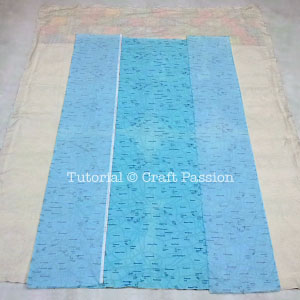
c. Lay the center of the backing piece with the wrong side facing downwardly.
d. Marshal it with the traffic lanes.
e. Drip it.
- Place the sides of the bankroll piece with right side facing down, align them with the side of the center baking piece. Drip.
- a. Turn the quilt to the right side and stitch in the ditch along the outer edge of the traffic lanes all the manner from meridian to lesser of the white slice.
You may utilize walking pes to stitch.
b. Remove the basting stitches and flip the 2 backing pieces to the side of the quilt.
- a. Join 2 rows of charm pack patchwork to the peak border of the text imprint piece.
b. With right side facing down, marshal them to the superlative of the back piece, allowing one/iv″ seam assart. This join is coordinated between the edge of the white and the charm pack patchwork on the forepart. You must be very precise on the alignment for good workmanship. Baste or pin.
c. Plough the quilt to the front end and stitch in the ditch. Remove basting stitches.
- This is how it turns out after stitching.
Take annotation on the text orientation. The text is upside downwards on the dorsum but when it is flipped over to the front, it becomes right side up.
- Smooth out all the textile pieces, check the alignment, baste the side pieces together and transfer the quilt to the quilting station for the adjacent process – gratis motion quilting.

- There are altogether 4 types of quilting pattern I used for this Road Runner quilt, namely:
ane. Pebbling on the traffic lanes.
two. Urban center Scape on the centerpiece.
3. H2O on the side panels, bottom console, and banner panel.
four. Simple circular round on the speed limit sign.
If you desire to try other quilting designs, you may grab a book called 365 Free Movement Quilting Designs to bank check out.
- a. Trim the quilt to 62″ x 84″ afterwards you have finished with the free motion quilting.
b. Bind the edges with a material binder strip. I fabricated a biased strip from 1-thou cloth because I chose to use checks print. You may use a straight grain line folder strip too.
Watch more detailed instructions on how to demark the edges in my Hole-and-corner Garden Quilt tutorial (scroll downwards till almost the end of the tutorial).
- The completed leap borders with mitered corners.
Wash the quilt earlier using if y'all take been working on it for a long time.

Source: https://www.craftpassion.com/road-runner-quilt-blanket/
0 Response to "On the Road Again Quilt Pattern"
Post a Comment